
Keywords: Plex Docker GPU VPN WireGuard
Wenn Ihr wie viele per 13.10.2023 von dieser unangenehmen Nachricht betroffen seid, hier ein Lösungsweg, den ich mit Hilfe meines Freundes Nick letztes Wochenende umsetzen konnte… und dabei gleich mal mein Plex Setup superchargen konnte. 😀
Unterm Strich kommt Plex in einen Container, und der darf nur noch mit der Außenwelt über ein WireGuard VPN sprechen. Damit ist das Thema IP Sperre des Hosting Anbieters erledigt. Zusätzlich habe ich einen physischen Server mit Grafikkarte eingesetzt um Transcoding via Hardware zu ermöglichen. Die folgende Anleitung enthält alle Schritte, die ich mir aus vielen verschiedenen online Howtos zusammengetragen und erfolgreich getestet habe. Viel Erfolg!
Contents
- Base System: Debian Linux 12 Bookworm on Bare Metal
- Installation: Docker & Docker Compose Plugin
- Installation: NVIDIA graphics card drivers
- Setup of VPN Provider (AirVPN)
- docker-compose.yml
- First launch and final tweaks
1. Base System
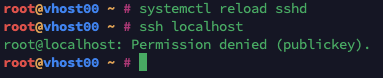
We opt for a plain headless Debian 12 Bookworm installation, secured by public key ssh and disabled password authentication. This is done by changing one line in /etc/ssh/sshd_config:

As well as reloading and successfully testing the result:
Then we apt update && apt upgrade -y and continue the rest of the setup…
2. Installation: Docker & Docker Compose Plugin
To install docker and its compose plugin (that means you invoke it without the – between docker and compose), it’s best to follow the official guide on docs.docker.com. I’ll summarize the relevant steps here anyway:
First we have to make sure no old versions of docker, etc. are installed:
for pkg in docker.io docker-doc docker-compose podman-docker containerd runc; do apt remove $pkg; doneWe want to be squeaky clean, so we better also remove a folder potentially containing images, containers, volumes and networks:
rm -rf /var/lib/dockerThen we add the official apt repository:
# Add Docker's official GPG key:
apt-get update
apt-get install ca-certificates curl gnupg
install -m 0755 -d /etc/apt/keyrings
curl -fsSL https://download.docker.com/linux/debian/gpg | gpg --dearmor -o /etc/apt/keyrings/docker.gpg
chmod a+r /etc/apt/keyrings/docker.gpg

# Add the repository to Apt sources:
echo "deb [arch="$(dpkg --print-architecture)" signed-by=/etc/apt/keyrings/docker.gpg] https://download.docker.com/linux/debian \
  "$(. /etc/os-release && echo "$VERSION_CODENAME")" stable" | tee /etc/apt/sources.list.d/docker.list > /dev/null

# update the archive
apt update
and install all the necessary components including the docker compose plugin:
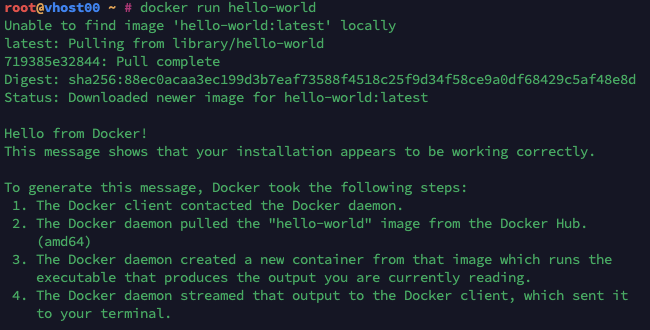
apt install docker-ce docker-ce-cli containerd.io docker-buildx-plugin docker-compose-pluginTo verify it all went smoothly, we can docker run one of our favorite images right there and then:
Installation: NVIDIA graphics card drivers
This part is a bit tricky, so I suggest to do it slowly. 🙂 First, we need the current drivers from the official Nvidia Download Site. (To identify your model lspci may or may not help.) Once we have the .run file, we place it in /root and continue to install some dependencies:
apt install build-essential linux-headers-$(uname -r) libglvnd-dev pkg-config…deactivate the default nouveau driver by editing
/etc/modprobe.d/blacklist-nouveau.conf
and adding these lines:
blacklist nouveau
options nouveau modeset=0
saving it and rebuilding the kernel initramfs:
update-initramfs -uand, after a reboot, take the deep dive:
#replace NVIDIA-Linux...run with your filename
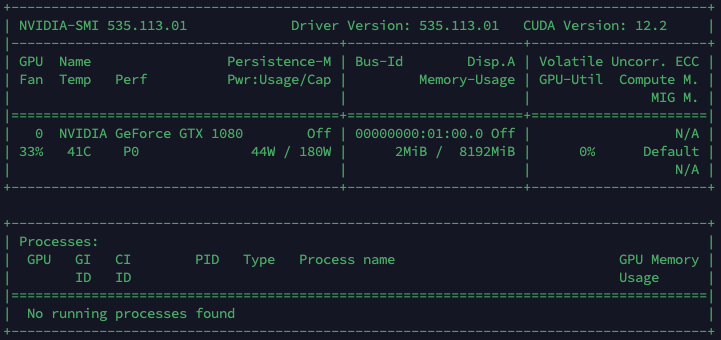
sh NVIDIA-Linux-x86_64-535.113.01.runWhen that completes without errors, another reboot. When the system is back, a quick run of nvidia-smi should show us a happy and bored GPU:
So now we can add Nvidia mojo to Docker:
# GPG Key again
curl -fsSL https://nvidia.github.io/libnvidia-container/gpgkey | gpg --dearmor -o /usr/share/keyrings/nvidia-container-toolkit-keyring.gpg

# APT source
curl -s -L https://nvidia.github.io/libnvidia-container/stable/deb/nvidia-container-toolkit.list |     sed 's#deb https://#deb [signed-by=/usr/share/keyrings/nvidia-container-toolkit-keyring.gpg] https://#g' | \
tee /etc/apt/sources.list.d/nvidia-container-toolkit.list

# installing the nvidia container toolkit
apt update
apt install nvidia-container-toolkit

# making docker speak Nvidia
nvidia-ctk runtime configure --runtime=docker

# restart docker
systemctl restart docker
And of course we check if the runtime is loaded with a quick call to docker info:

Or we even go a level deeper and run nvidia-smi from within a container and lo and behold:
docker run --gpus all nvidia/cuda:11.6.2-base-ubuntu20.04 nvidia-smi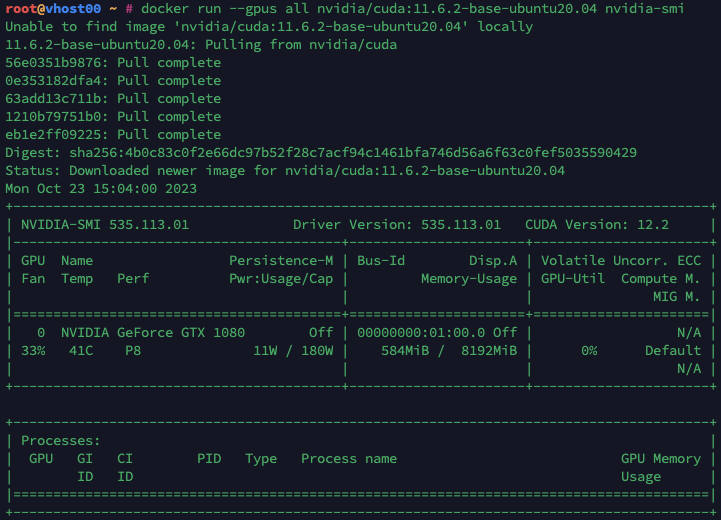
Setup of VPN Provider (AirVPN)
For a VPN Provider our choice falls on AirVPN. We have been using it for ages, it’s reliable, and prices are fair. Also, it supports WireGuard, which is the way to go in 2023. One can connect up to 5 devices (sessions) in parallel and it supports port forwarding, which we’ll need here.
After sigining up for a subscription, the following steps need to be completed in the Client Area:
- Create a new VPN Device
- Add a Port Forwading
- Create a config for Linux WireGuard
In Port Forwarding we get assigned a random source port and may choose the destination port to be the same (which is the default anyway), as we do the mapping to Plex (port 32400) in docker later:
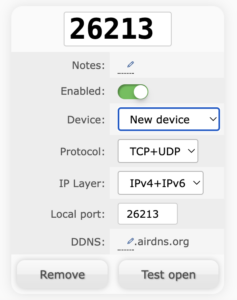
The port is assigned the VPN Device (New device) we created before. I’d avoid using — all devices — as this may lead to conflicts if we decide to use our AirVPN account (remember, 4 more parallel sessions!) for anything else later on.
When creating the WireGuard configuration, there’s no need to click Advanced. All we need is Linux, WireGuard, VPN Device and the exit node country of our choosing (Belgium is only an example):

We scroll down to the bottom, click Generate and save the config file as wg0.conf in a temporary folder. (Naming is important: The wirecard image will only pick up wg*.conf files in its config folder.)
docker-compose.yml
Almost there! For the first launch of plex we’ll need a claim token, which we can get here: https://plex.tv/claim. It’s only valid for 4 minutes, and also is only picked up by the image on first launch so I suggest to do this at the very end. This is why we start with the non-plex components, and when those are running smoothly, add plex to the mix.
We keep our docker compose projects separated in folders under /root. So this one lives at /root/plex.
We put the wg0.conf from the previous step in /root/plex/wireguard/config/wg_confs/
and continue with the docker-compose.yml, not forgetting to add the specific port from the forwarding configuration in the previous step!
# the network is optional but will insulate this from other projects on a named net
networks:
    plex-net:

services:
  wireguard:
    image: lscr.io/linuxserver/wireguard:latest
    container_name: wireguard
    cap_add:
      - NET_ADMIN
      - SYS_MODULE
    environment:
      - PUID=1000
      - PGID=1000
      - TZ=Europe/Berlin
      - ALLOWEDIPS=0.0.0.0/0, ::/0
      - LOG_CONFS=false #optional
    volumes:
      - ./wireguard/config:/config
      - /lib/modules:/lib/modules
    sysctls:
      - net.ipv4.conf.all.src_valid_mark=1
      - net.ipv6.conf.all.disable_ipv6=0
    restart: unless-stopped
    networks:
      - plex-net
  tcpproxy:
    image: hpello/tcp-proxy
    container_name: plexproxy
    environment:
      - LISTEN_PORT=26213 # here we put the port from AirVPN
    command: localhost 32400 # this is the standard Plex port
    network_mode: container:wireguard
    depends_on:
      - wireguard
    restart: unless-stopped
Start this with docker compose up -d from within the /root/plex folder and watch the services spinning up. We can check if WireGuard is working correctly by seeing if there’s a wg0 interface in the container:
docker exec -it wireguard ifconfig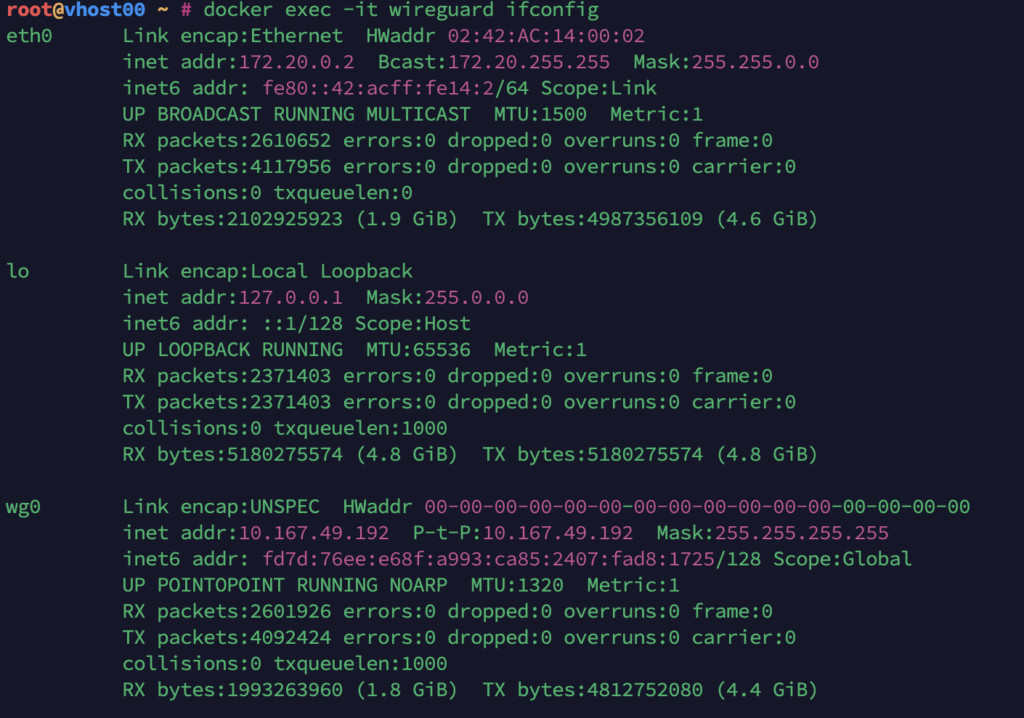
If there’s issues, docker logs wireguard will give us insight.
Now, lets add the plex server to the docker-compose.yml. Since we have it depend on WireGuard, we can add it below or above the existing configuration. We adapt the volumes section to the structure of our media collection, collect ourselves a claim token from https://plex.tv/claim and fill it in:
  plex:
    image: lscr.io/linuxserver/plex:latest
    container_name: plex
    network_mode: container:wireguard
    deploy: # this is only necessary with a GPU
      resources:
        reservations:
          devices:
            - capabilities: [gpu]
    depends_on:
      - wireguard
    environment:
      - PUID=1000
      - PGID=1000
      - TZ=Europe/Berlin
      - VERSION=docker
      - PLEX_CLAIM=# *** add claim token here ***
      # add the following lines if you have a GPU
      - NVIDIA_VISIBLE_DEVICES=all
      - NVIDIA_DRIVER_CAPABILITIES=compute,video,utility
    volumes:
      - ./plex/config:/config
      - /mnt/media/tv:/tv
      - /mnt/media/movies:/movies
    restart: unless-stopped
After spinning it up again by docker compose up -d from within the /root/plex folder, we see the new container being created and hopefully we’re almost there…
First launch and final tweaks
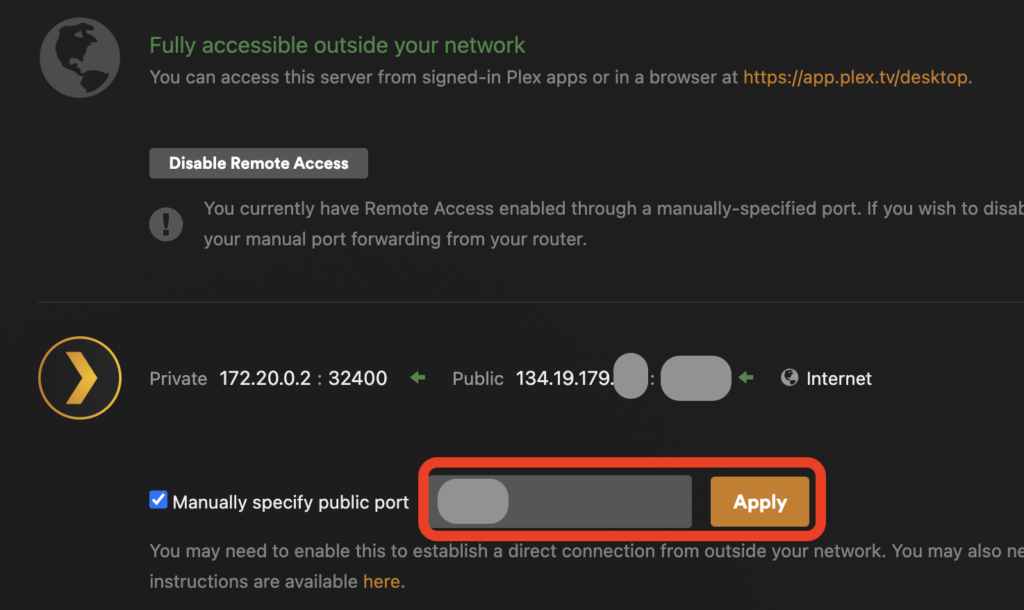
If everything went correctly, we can now add the plex server to our account by navigation to http://exit-IP:port from the client area in AirVPN (sessions):
So in this case it would be http://134.19.179.xxx:26213.
Plex should greet us, and let us add the server. In the server settings, under Settings / Remote Access we need to specify the public port (26213 in this example), click Apply and enjoy the green lights. 🙂
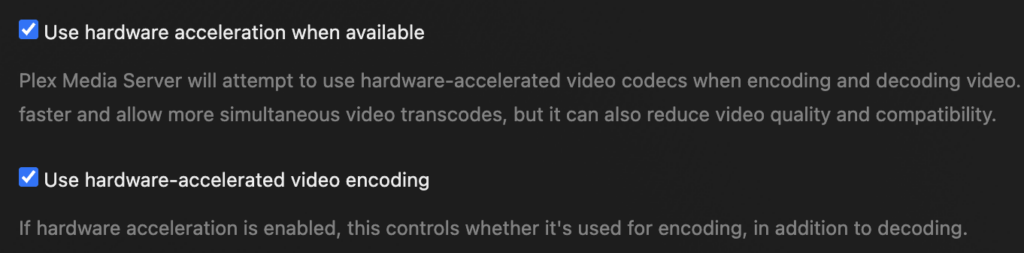
After adding the sources (from /tv and /movies in this example), we enable hardware accelleration in Settings / Transcoding:
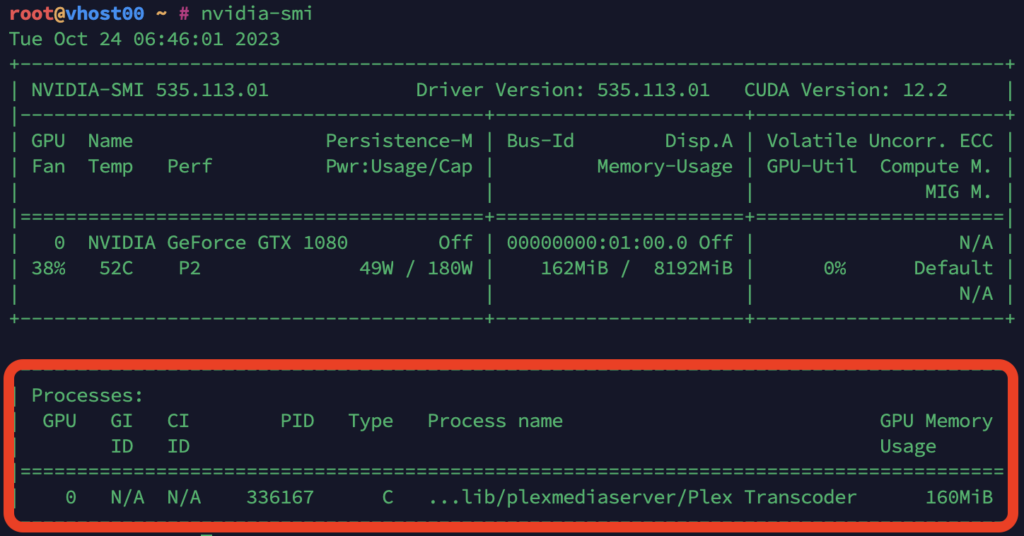
We can check if our trusty GPU is indeed helping Plex by forcing it to transcode a video stream (via quality settings in playback). And lo and behold there’s a little (hw) next to the job in the Dashboard:

A look in nvidia-smi on the host confirms this:
That’s it. Hope this helps. 🙂
Leave a Reply